[ Home ] [ Site Map ] [ Site Search ] [ Back to last page ]
[ Home Networking Part One ] [ Technical Info ]
[ Hardware ] [ Network Cards ] [ NIC Install ] [ Hubs and Cables ]
[ Network Settings ] [ General Settings ] [ NetBEUI Settings
]
[ TCP/IP Settings ] [ IPX/SPX Settings ] [ Final Check ]
This web page has a large number of graphics and screen shots. If you have a slow internet connection this page will load slowly. I thought about using thumbnails instead, but decided that in the interest of making your job of setting up a home network as easy as possible, I chose to use the actual images.
If you disagree with me I'm sorry, but I feel this is the best way to do this webpage. Please be patient, I think you'll find the page to be worth the wait! On a 56K modem with a good connection this page can take anywhere from 90 seconds to 3 minutes to load. I will not split this page up. I'm one of those that get ticked when I have to click "next" just to see another couple of paragraphs. Besides, if you decide to print this page think of the hassle if you had to go to 3-5 different pages to get it all.
This page is available for download with all the images on my download page. I may make it into a PDF document as well. If I do, it too will be available on my download page.
Quite a few people have used this page to successfully setup a home network. Some folks get stuck for various reasons. While I'm more than willing to help, this is such a large topic that I can NOT do it via email. So please DO NOT ask! I can not help with WinNT or Win2000 networking questions since I don't use these operationg systems. If you need my help, we'll have to setup a time for you to call me. Please note that I live in Ohio and that Amy would kill me if I paid for the call :-) So you must be willing to pay the long-distance charges if you call me.
If you try to setup your network and get stuck, the very first thing to do is to slowly and carefully check all the settings as listed below. Most of the folks that call me simply have some settings wrong. I hate to have folks pay for a long-distance call when all the info is right here.
Another thing to think about is a personal firewall. Many firewalls will keep your home network from working properly. Personal firewalls can be configured to work with a home network, but many people have had them installed prior to setting up the network and they just don't think about it.
Please get the network up and running well before you think about internet sharing. If you have Win98SE or newer you can install ICS (Internet Connection Sharing). Plus there are many other methods available to share one internet connection...but this is another topic.
This page is for all versions of Win95, Win98, Win98SE, and WinME. NOTE: WinME has some extra ... ahem... features but this will work just fine. Also, as with any major changes to your system, you should back up any important data in the event that this procedure hoses your 'puter! I have never had a problem while setting up a network, but a friend of mine has. So play it safe!
This webpage is part two in the Home Networking series. Part one talks about why you might want a network as well as the possible uses of a network in the home. Part one is the place to start, so if you haven't read it you might want to.
This page is not designed to be the "end all" in Networks! It is simply a step-by-step guide on how to set up a network at home for file sharing, network gaming, sharing printers, and sharing one internet connection between multiple 'puters. If this webpage doesn't tell you all you wish to know, you might want to get some books on the subject.
This is not meant for networks larger than 2-10 'puters. Larger networks have special needs that won't be discussed here. Nor will the 10 megabit vs. 100 megabit issue or the pros and cons of hubs vs. switches be discussed here. Most home networks have no need for the above, and if you don't know the above terms... don't worry about it, you don't need to know. For those that do want to discuss the above issues please email me to set up a time when you can call me to discuss them.
There are a number of other devices you can use to set up a network. From USB network cards to phone line network cards. I dislike all of them. They can be easier to set up. However, they tend to be slower, and sometimes they can have major problems.
Let me make a brief statement about the brand of parts to chose. This is a money vs. speed choice. It's that simple. I like 3Com (more pricey), and Linksys parts. In my opinion, both brands are just as good quality-wise. If money is a concern, or you don't want/need the 10-15% speed gain go with Linksys for all your parts. If you want the best, go with 3Com for all of your parts.
First you'll need to buy and install the hardware needed for your network. You will need one network card or NIC (Network Interface Card) per 'puter. If you use a NIC with a DSL or cable modem to get onto the internet, you will need a second NIC as well for the network. The first thing to do is take the cases off your 'puters to determine if you have an available slot free to install the NIC in. Slots come in two flavors, PCI and ISA. PCI card slots are white in color and are shorter than ISA slots. ISA card slots are black in color and are longer than PCI slots. Look closely here, some main boards (motherboards, the thing all the cards plug into) have a PCI/ISA shared slot! You will see a PCI slot next to an ISA slot but there will be only one shared place in the back of the case for the card to stick out. In this case you can use only one slot, either the PCI or the ISA, but not both. For the nit-pickers out there, in some cases there is a card that is internal only so both slots can be used, but this is fairly rare.
If you have both types of slots free then it's your choice whether to go PCI or ISA for the NIC. There are some points to ponder here. ISA is an older, slower technology, it will soon be out-dated, an ISA NIC will use slightly more CPU time (will slow your 'puter slightly during big data transfers). ISA is sometimes harder to get installed without conflicts in Windows. While ISA costs a bit less, I highly recommend going with a PCI network card.
In case you've never installed or changed any hardware in your 'puter's case, here are a few pointers.
Static electricity is your biggest worry! One small shock can fry a 'puter part! Sure, you can buy a grounding wrist strap at your favorite Radio repair shop (or Radio Shack), but if you're reasonably careful I feel that this is not needed.
All you need is a Phillips screwdriver and some patience.
I prefer to sit on a non-carpeted floor with my shoes and socks off while I'm working inside a 'puter with no kids, cats, or dogs around to shock me or the 'puter.
Don't be in a hurry!
Here are some images of both a PCI combo card (top) and an ISA combo card (bottom). Combo means it can except both coax (or BNC) and 10BASE-T (or Cat-5) cable. More about the differences in cables below.
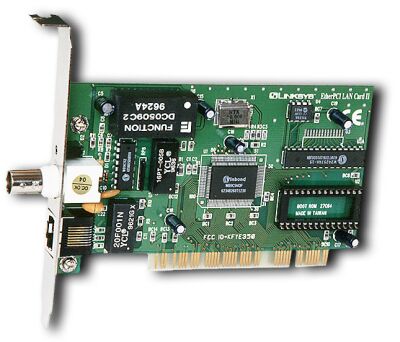
This is a PCI combo card from Linksys.
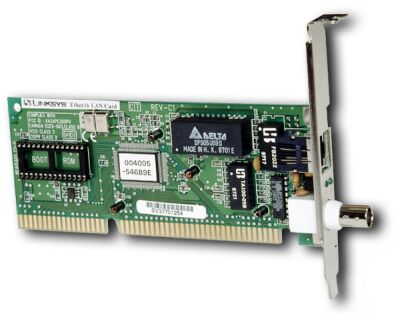
This is an ISA combo card from Linksys.
Are you ready to install the new NIC? Here we go...
First, let me give you some photos so that it'll be easier for you to understand all of this.
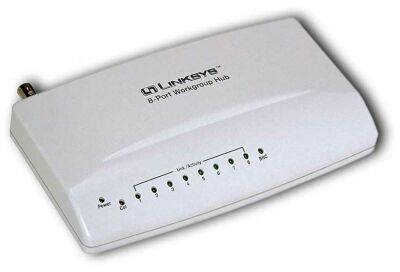
This is a Linksys 8 port hub.
|
|
|
|
|
|
|
Now you have to look into your crystal ball and make a decision. To use a hub, or not to use a hub. Let me give you the pros and cons...
Hub:
NON-Hub:
Third Choice: if you have only two 'puters, you can use a cable called a crossover cable. A crossover cable is a special cable that has the wires in the cable set up a different way. Most 'puter stores have them for sale.
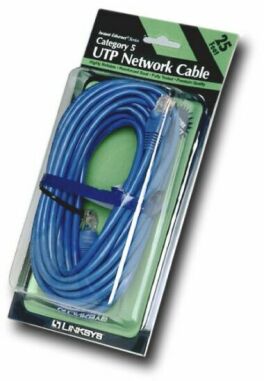
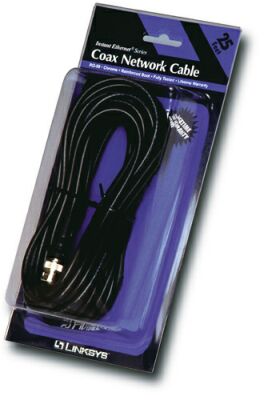
They do make hubs for use with BNC cable, but if you're going to use a hub, go the Cat 5 route.
If you choose to use a hub plan on the following;
If you choose to go the non-hub route plan on the following;
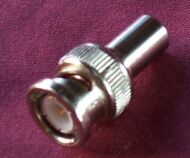
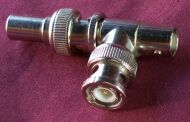
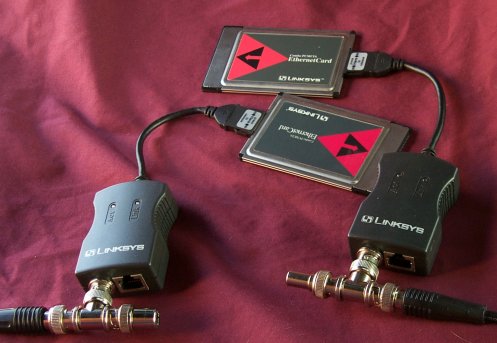
Here's an example of how coaxial cabling hooks together. I use coaxial to connect Amy's and my laptops when we're on the truck.
Now that you have all the NICs installed, you've checked device manager for conflicts (you did check didn't you?). If you want to check, go to start | settings | control panel | system | then the device mgr tab, then look down at network adapters. You've ran all the cables, plugged in the hub if you have one, or checked all the TEEs and terminators for tightness, and now you're ready to change all the needed settings in Windows so the network will work correctly.
Please note, this is how I set up every network I work on, others may have a different way of doing things, but these are the settings that I've found to work very well in almost every situation.
Let's get started. Except when noted, you will do the exact same steps to every 'puter on your network. So use this page to set up one 'puter, then you'll have the first 'puter as a guide for all the rest. A few points to always remember, each 'puter must have a different name! It will really mess up your network if you use a name more than once! Each 'puter must have a different TCP/IP address as well, no two 'puters can share the same TCP/IP address. I will explain how to do these steps below.
If you have an icon on your desktop called either Network Neighborhood or Network Places, simply right-click on it and choose properties from the context menu. If you don't (not to worry, it'll show up) go to start | settings | control panel | network, and you'll end up at the same place.
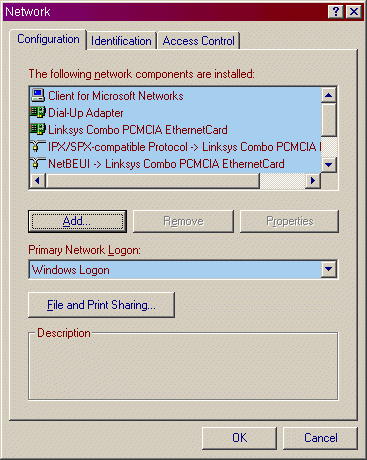
This is the first window you see. I call it the General Window. Don't worry if all the settings don't look the same. Some 'puters need other stuff. If you have AOL you'll see lots of other junk ... er ... stuff :-)
Dial-up Adapter has to do with using a modem to connect to the internet or another 'puter. We won't mess with that at all.
The first thing to do is to add some protocols. Protocols are like different languages. If you only spoke French, and I only spoke English, how could we talk to each other? Well, 'puters are the same way. Plus, some protocols are better for certain functions. In a home network here are some examples:
So, we install all three. There are others, but for the average home network they're not needed. So to start, click the Add button.
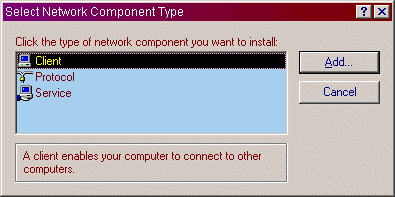
This is what you'll see after you click the add button. Left-click on Protocol to highlight it, then click the add button.
Now you see this window. Depending on your version of Windows there can be a lot of stuff here. Just ignore anything we don't talk about, you probably don't need it.
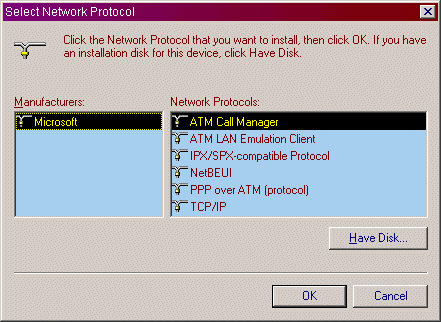
To add a protocol, first you need to left-click on Microsoft on the left side of this window, then left-click on NetBEUI on the right side, then click OK. Windows will think for a moment, then you'll be at the General Window again.
Now you want to repeat the above steps again but choose IPX/SPX instead, then click OK. After a pause you'll be at the main screen again. You should now have TCP/IP, NetBEUI, and IPX/SPX for all adapters. If for some reason TCP/IP is not installed, just follow the above steps to install it. An adapter is the device that the protocol talks to. A NIC is an adapter, so is a dialup adapter, and so on.
Now I want you to delete some protocols that are not needed. Without getting too geeky... the more protocols you have, the slower the network will become. When you add a protocol it adds it to every adapter you have. If you don't have a regular phone modem, or use AOL you might only have one adapter... your NIC. In that case you can skip the delete step. Most people will have more than one adapter in their system. For instance, if you have a Dial-up adapter, both the NetBEUI and IPX/SPX protocols would also be installed for the dial-up adapter. Since they're not used or needed we'll delete them.
The only adapter that needs NetBEUI and IPX/SPX is you NIC for your home network. Any other instance of NetBEUI or IPX/SPX can be left-clicked on to highlight, then deleted by pressing the delete button. If you have more than one NIC (Network Card) in your 'puter, for a DSL or cable modem, you can delete the NetBEUI and IPX/SPX protocols for that as well.
So when you're done you'll see TCP/IP for every adapter, and NetBEUI for only the NIC adapter for your home network, and IPX/SPX for only the NIC adapter for your home network. Does this make sense to you? If not, stop and re-read the above text. If you're stuck here please fill out a helpme request and I'll either try to answer your questions, or I'll set up a time for you to call me so I can walk you though all of this.
Ok, now we're back at the general window.
See the area called Primary network logon? This is what gives you the nag screen on bootup.
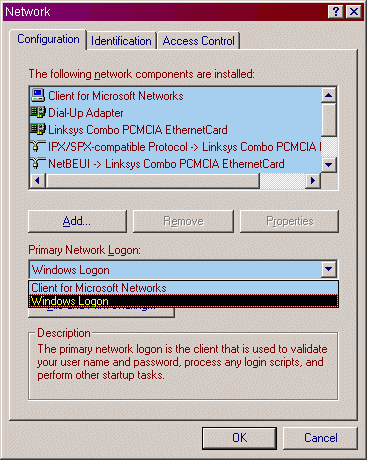
Change this to Windows Logon. Now click on the File and Print sharing button.
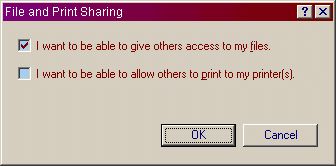
Here is where you decide if you want to share files and/or printers. This is for only this 'puter. Check the box for file sharing, and check the printer box if you'd like to share the printer that is connected to this 'puter with other 'puters. Then press the OK button and you'll be back at the General Window.
Now look at the top of the General Window and click on the Identification tab.
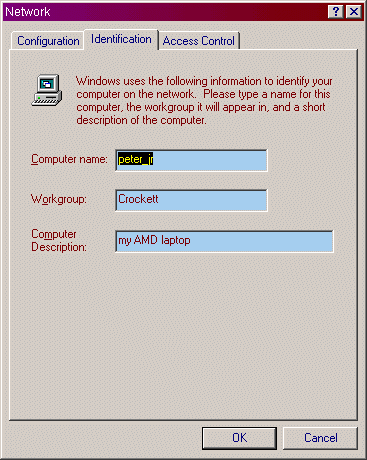
OK, these settings may have been made during the install of Windows, or Windows might have made you put something in here during the install of the NIC drivers. Now is the time to make sure everything is correct.
First is the 'puter name. It can be almost anything you want it to be. To keep things simple I suggest you make it one word, no spaces, all lower case. That way if you ever connect to a Unix or Linux 'puter life will be easier :-) Remember, the name must be unique! If you re-use this name on any other 'puter on your network you will have seriously weird things happen!
Second, name your workgroup. Again, one word is preferred. Case does not matter. This must be the same word on every 'puter on the network. Workgroups are used on really big networks to make it easier to find just the 'puters in your office or department.
Last is the 'puter description. This can be whatever you want or can be left blank.
Click OK to go back to the General Window. Now click on the Access tab at the top.
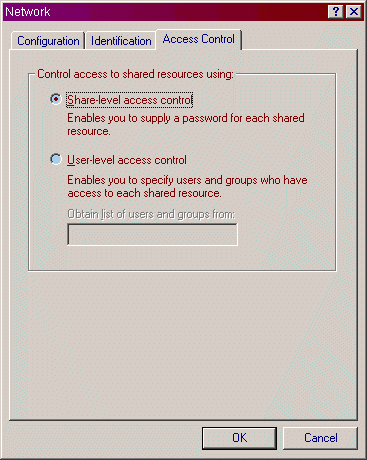
Make sure that the Share-level access control radio button is chosen. This is the default setting. Unless you have a Windows NT or Windows 2000 'puter on the network, you must use this choice. If you want to learn more, get the Windows Resource Kit from Microsoft.
Click the OK button to go back to the General Window.
Are you still with me? Good, now we're going to go through the properties of everything listed in the top third of the General Window that has to do with you home network. Keep in mind, the reading of this page will take you longer than the actual setup.... go figure :-)
As I tell you to, you'll left-click on an item to highlight it, then you'll click on the properties button to go to that new window.
Now I want you to go to the properties for Client for Microsoft Networks. Again, left-click on the line that reads Client for Microsoft Networks to highlight it, then click on the properties button.
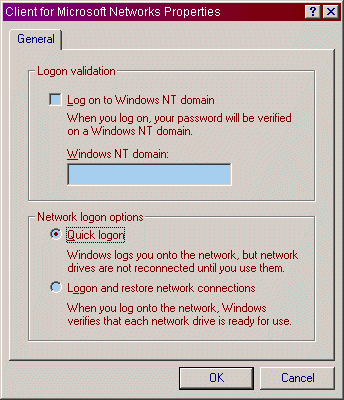
Choose Quick logon here. If you map some network drives later, they'll be available the first time you use them, but if the network is down for some reason, you won't get a nag screen on bootup. Click OK to go back to the General Window.
Now find the line that says either just NetBEUI, or NetBEUI for (whatever you NIC is called) Click on it to highlight, then click the properties button.
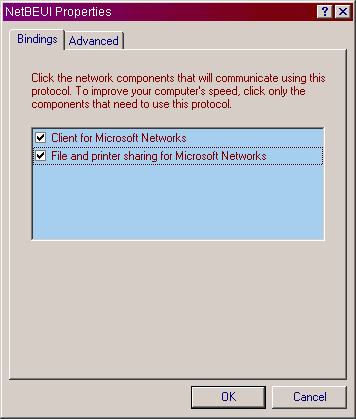
Make sure both boxes are checked here.
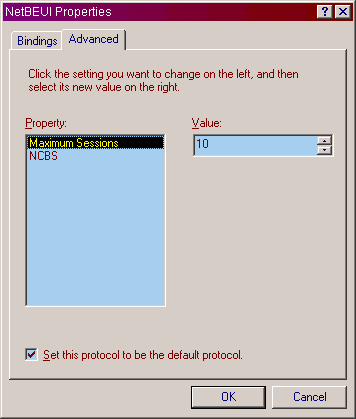
The only thing to do here is to check the box to make this the default protocol. Then click OK to go back to the General Window.
Now click on the line that reads either just TCP/IP, or that reads TCP/IP for (whatever your NIC is called), then click on properties.
This is where it gets complicated. You don't have to understand this very well except for one very important point. We will be assigning IP addresses to each 'puter. Each address MUST be different! The first address for the main 'puter, or the one that connects to the internet, or the one that acts as the game server for your network games (if you have any), it gets the IP address of 192.168.0.1 . The next 'puter gets an IP address of 192.168.0.2 , then next 'puter gets the IP of 192.168.0.3 , and so on. Only the last digit changes here! The last digit can go as high as 254, not that you'll ever get to that number.

Here's where you set the IP address for this 'puter. Click Specify an IP address, then put in an address like 192.168.0.xxx (replace the 3 Xs with a number starting at "1") and with each new puter go up from there... like this 192.168.0.1 then the next 'puter gets 192.168.0.2 , then the next gets 192.168.0.3 , and so on. Remember, they MUST be different on each 'puter! Then make the subnet mask for every 'puter the same, it will be 255.255.255.0 . You will see the check box for Detect connection to network media only in WinME. As for what this button does... I have no idea yet :-) Now click on the Gateway tab.
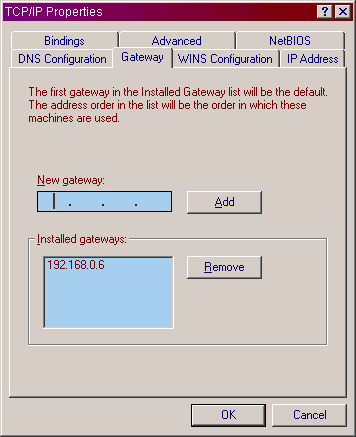
You will only change the settings here if you use ICS (Internet Connection Sharing), or some other form of Proxy Server. If this is the 'puter that is directly connected to the internet leave this box blank. If this is a different 'puter, put in the IP address of the 'puter that is directly connected to the internet. Now click on the DNS Configuration tab.
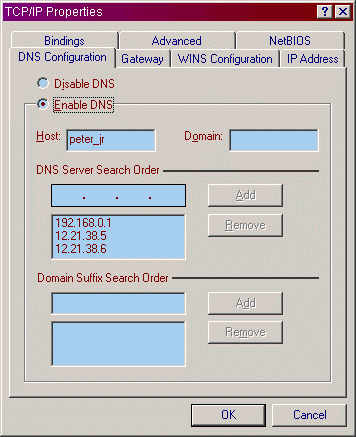
Again, unless you have a reason to do so, you will not do anything on this tab. I *think* even if you use ICS (I have not used ICS, I use IP MASQ through Linux...and that's another story) you'll leave this alone. Some Proxy Servers *may* require you to make some changes here. Click on the bindings tab.
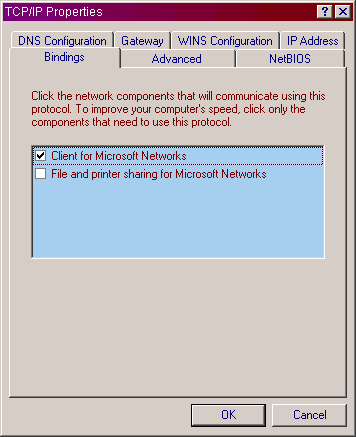
Make sure you UNcheck File and printer sharing for Microsoft Networks! You don't need or want it. Plus it helps with security on your 'puter too. You will not change anything on any of the other tabs. Click OK to go back to the General Window.
Now we're getting close to being finished. How many of you read all of this in one sitting, raise your hand? Really? That many of you? Very good (I know, a feeble attempt at humor).
Please highlight the line that reads either IPX/SPX or IPX/SPX for (whatever your NIC is called), and click the properties button.
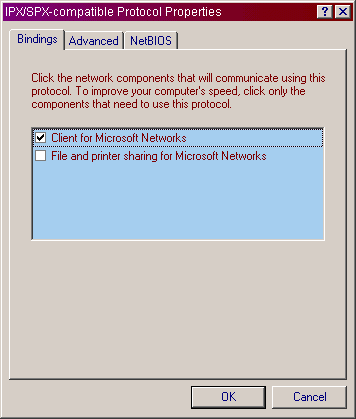
This is the only setting you'll change. Uncheck File and printer settings for Microsoft Networks. This is a good security precaution as well as a small way to speed up your network. Click OK to go back to the General Window.
You are now back at the General Window for network properties. Before you push the OK button, you may wish to go through all of these settings again to make sure you get them correct. I also suggest that you only do one 'puter at a time :-) If you're sure that everything is how you want it, go ahead and press the OK button now. Windows will think for a bit, it may ask you to insert your Windows CD, then it will pop up a window asking you to restart to finish the changes, say YES here.
Just a note. If you choose to print this page, you should be aware that you'll be printing around 24-28 pages :-)
Now that you have this nifty network all setup, what can you do with it? First, let's set up file sharing. Double-click on My Computer, then right-click on your "C" drive, then choose Sharing from the context menu that pops up.
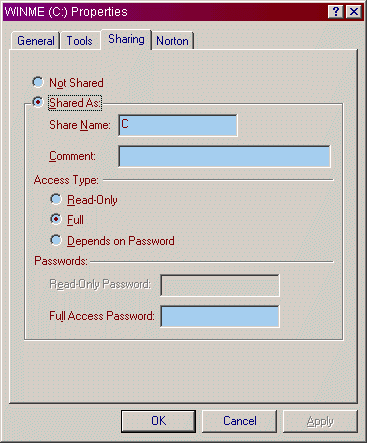
Change the radio button to Shared As, leave the share name alone, choose Full if you want people on the network to be able to both read and write, or choose Read-Only if you want them to be able to just read but not write.
You may enter a password if you want, but you don't have to. Click OK and you're done. (Apply is to make the changes but leave the window open. By clicking OK, it will apply the changes and close the window).
Now follow the same steps on any other drives you wish to share. If you'd like, you could just share certain folders or files instead...but IMHO it's a pain to do it that way.
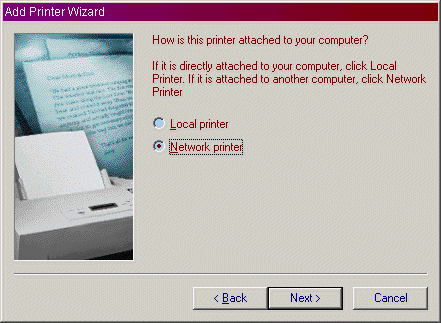
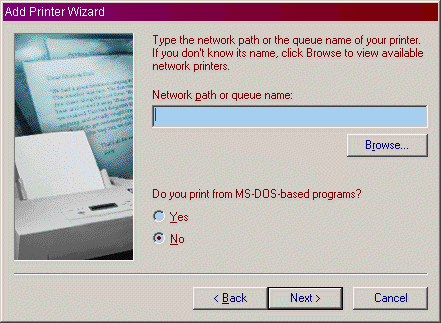
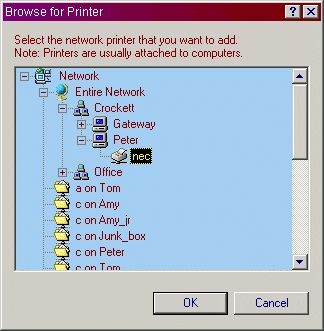
Now do the same for any printers you wish to share. NOTE: After you share a printer, the other 'puters have to install the printer. From the other 'puters just start the Add New Printer Wizard, choose network printer, say no to DOS printing (it's a pain), then browse the network to find the printer. Then continue with the wizard till you're finished.
At this point you should open an Explorer window to see if you can see the other 'puters. If you can, you're done. If you can't see the other 'puters, you have some settings wrong. Which means it's time to go through this page again.
[ Hardware ] [ Network Cards ] [ NIC Install ] [ Hubs and Cables ]
[ Network Settings ] [ General Settings ] [ NetBEUI Settings
]
[ TCP/IP Settings ] [ IPX/SPX Settings ] [ Final Check ]
[ Home ] [ Site Map ] [ Site Search ] [ Back to last page ]
[ Home Networking Part One ] [ Technical Info ]